
Also see: Tools | Components starter kit
It can be difficult to find a suitable place for soldering electronics projects at home. A desk or dining table is certainly NOT suitable without some form of protection! You will need a convenient socket for your soldering iron and most homes have them near the floor which is too far away. Remember the flooring material too, this can be damaged by molten solder dropped off your iron.
One solution is to make your own workbench from a relatively cheap material such as white-faced chipboard (usually called 'furniture panel'). A socket for your soldering iron can be provided behind your workbench by using an extension lead with a 4-way socket which can be fixed to a wall.
If you have to use an ordinary table take care to protect its surface by working on a wooden board (an old drawing board is ideal). Putting a cloth under the board will prevent it scratching the table.

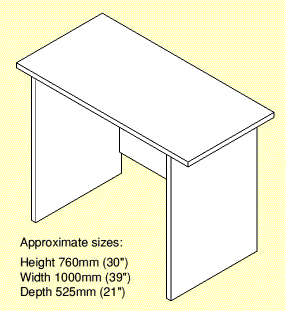
This section shows how to make your own workbench from two 1820mm (6') lengths of white-faced chipboard 'furniture panel'. This is available in various widths: 525mm (21") is probably the best to form the depth of the workbench, but you may prefer 450mm (18") or 600mm (24"). Wood-effect finishes are available at a higher cost. The pieces are held together with joint blocks to make construction easy.
The height is suitable for use with a desk chair or dining chair, but none of the dimensions are critical so you can adapt the size to suit the space you have available. The workbench can double as a desk for homework if necessary (and this may help to justify the cost).
1. Cut the panels
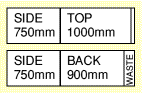
The drawing shows how to cut them from two 1820mm panels.
The measurements are not critical, you can adapt them to suit the length of material and
space you have for the completed bench. However, make sure the two sides are identical!

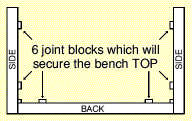
2. Fit the joint blocks
Screw the 10 joint blocks flush to the edges of the panels as shown.
Note that the back is a vital part of the structure, not an optional extra.
3. Assemble the sides and back
Put the back down on a flat surface and join the two sides to it.
Take care to ensure that the top edges (with the unused joint blocks) are flush.

4. Add the bench top
Put the bench top on the floor with its best side down, then attach the sides and back.
5. Finally, apply edging strips
Turn the bench over so it is the correct way up and apply two strips of iron-on
edging to the cut ends of the bench top. Use a domestic laundry iron for this, not
a soldering iron. Use a knife (take care) to trim the strips. Your new workbench
is ready to use!


